Creative Grids Pineapple Quilt Block Tutorial
|
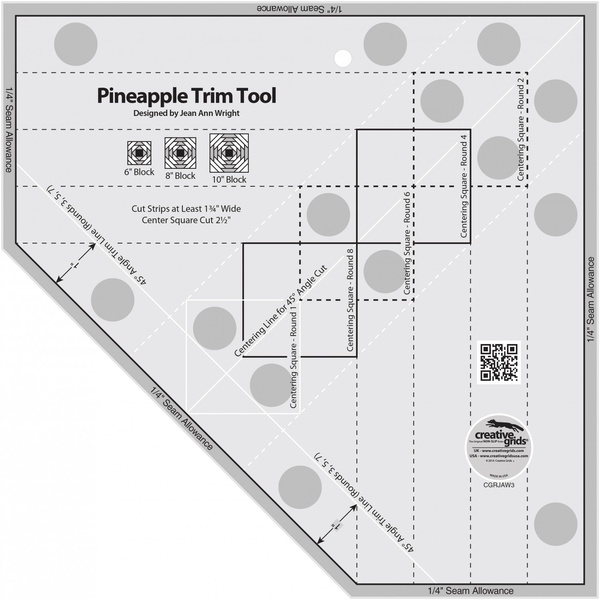
Pineapple Quilt Blocks look complicated but the Creative Grids Pineapple Trim Tool makes them surprisingly easy to piece accurately. Instead of trying to sew perfectly sized triangles and strips, you build the block one round at a time and trim after each round. The trim tool does the measuring and centering for you.
My tutorial walks you through an 8 inch finished pineapple block using four rounds of strips. The finished block will measure approximately 8 1/2 inches unfinished, including the 1/4 inch seam allowance.
A key tip to remember: The light colored rounds are odd numbers (1, 3, 5, etc.)
The dark colored fabric rounds are even numbers (2, 4, 6, etc.)
This is important to know when aligning your trim tool to your block.
The center square stands alone. |
 |
| |
| |
What You Will Need:
- Creative Grids Pineapple Trim Tool
- Rotary Cutter and Cutting Mat
- Quilting Ruler, if needed for preparing strips
- Thread
- Iron and Pressing Surface
|
| |
| |
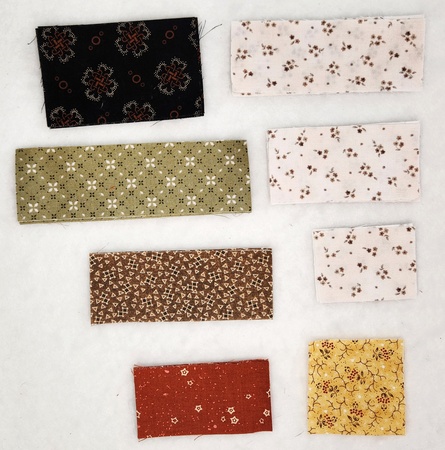 |
Step 1: Start with the Center Square
- Cut your center square to 2 1/2" x 2 1/2".
The center square is the foundation of the entire block, so take a moment to make sure it is accurately cut.
For my block, my yellow/gold fabric is my center square. |
| |
| |
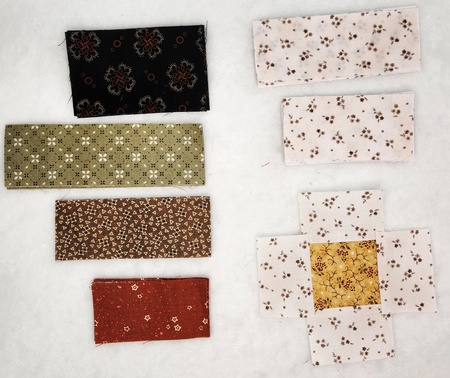 |
Step 2: Add Round 1
- Round 1 is made from light strips.
- Place one light strip along one side of the center square, right sides together.
- Sew using a 1/4 inch seam allowance.
- Add a strip on the opposite side in the same way.
- Press both strips away from the center.
- Sew one strip to each remaining sides.
- Press both strips away from the center.
You will now have a light strip surrounding all four sides of the center square.
Don't worry if the edges extend beyond one another. That extra fabric is exactly what we want at this stage. |
| |
| |
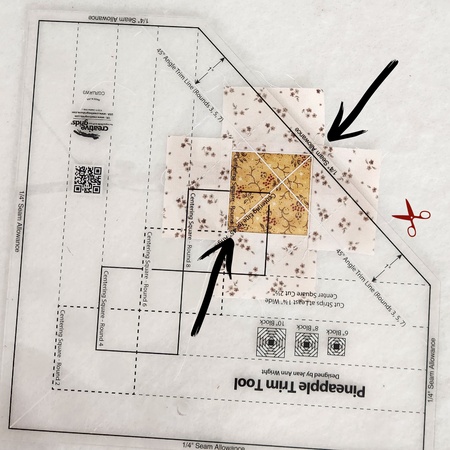 |
Step 3: Trim Round 1
Now the Creative Grids Pineapple Trim Tool goes to work. The trim tool's 45 degree trim line creates the angled edges that form the pineapple design.
- Using the centering marks on the trim tool labeled "Centering Square - Round 1", place the trim tool on the fabric center square.
- Before cutting, check three things:
- The trim tool is centered on the block.
- The appropriate centering lines are lined up with your seams
- You are leaving the 1/4 inch seam allowance indicated by the ruler.
- Trim along the ruler edge marked "1/4" Seam Allowance"
- Rotate the block and repeat until all four sides have been trimmed.
|
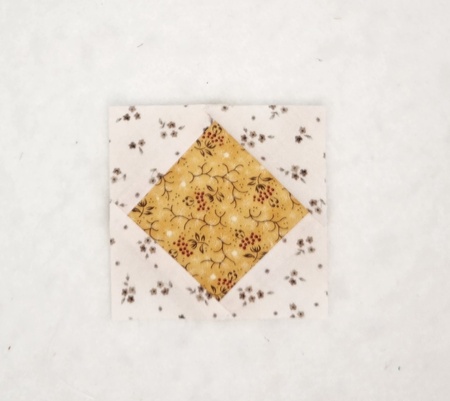 |
After trimming, your center will look like a diamond surrounded by four light triangles.
Round 1 is complete.
Tip: Each time you use the trim tool, line it up before looking at the outside edge of the fabric. The trim tool markings, not the slightly uneven fabric edges, are what keep the pineapple centered. |
| |
| |
 |
Step 4: Add Round 2
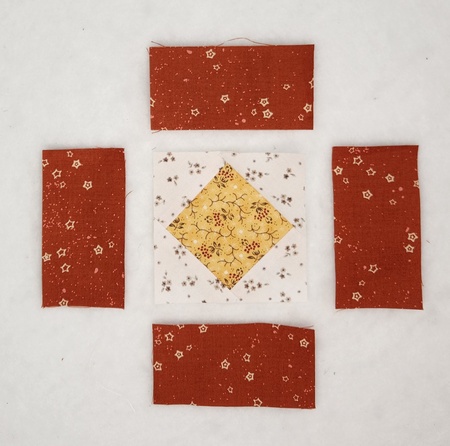
- For Round 2, add four strips of your next fabric. I used a burnt orange fabric.
- Just as before, sew a strip to one side with a 1/4 inch seam allowance.
- Press away from the center.
- Add the opposite strip and press.
- Complete with the two remaining sides.
|
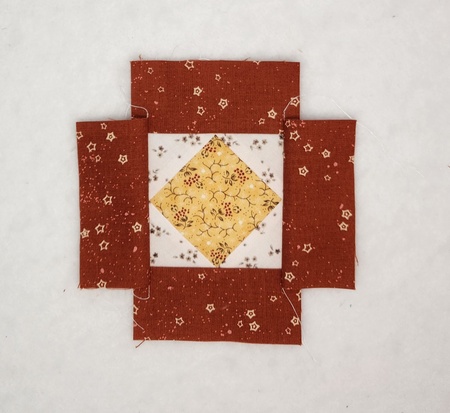 |
After sewing and pressing, all four burnt orange fabrics surround the first round.
It will look a little oversized and boxy right now. That is normal. |
| |
| |
 |
Step 5: Trim Round 2
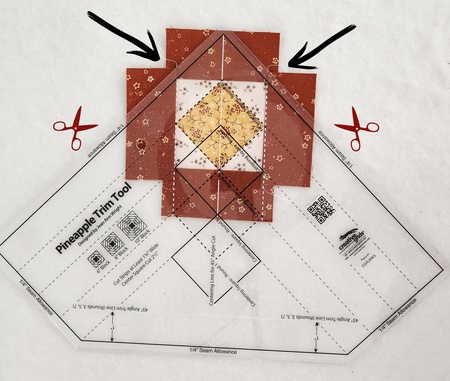
- Place the Creative Grids Pineapple Trim Tool over the center square again.
- This time, use the ruler markings labeled "Centering Square - Round 2".
- Carefully align the printed reference lines with the seams you have already created.
- Once everything is aligned, trim the exposed fabric along two sides of the ruler.
- Rotate the block, repeat the alignment, and trim along the remaining two sides of the ruler.
Be especially careful to preserve the 1/4 inch seam allowance beyond your points. You do not want to trim the points directly to the raw edge. |
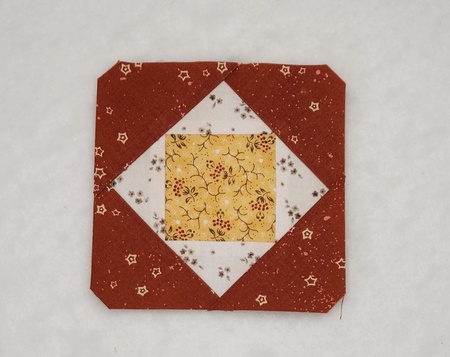 |
After trimming, your second round is complete.
You can already see the pineapple pattern beginning to emerge. |
| |
| |
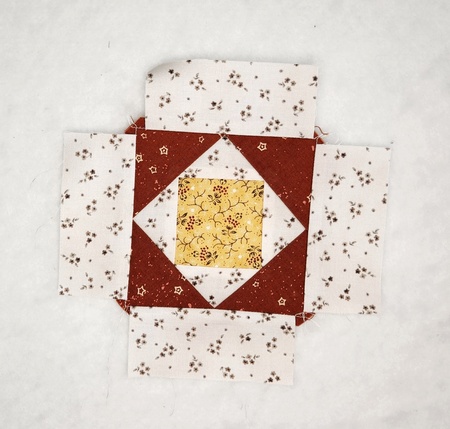 |
Step 6: Add Round 3
- Round 3 returns to the light fabric in my sample.
- Arrange a strip on each side of the block.
- Sew the strips to opposite sides first.
- Add the remaining two strips.
- Use a consistent 1/4 inch seam allowance.
- Press each seam away from the center.
Again, do not try to make the outside edges perfectly even. The trimming step will do that for you. |
| |
| |
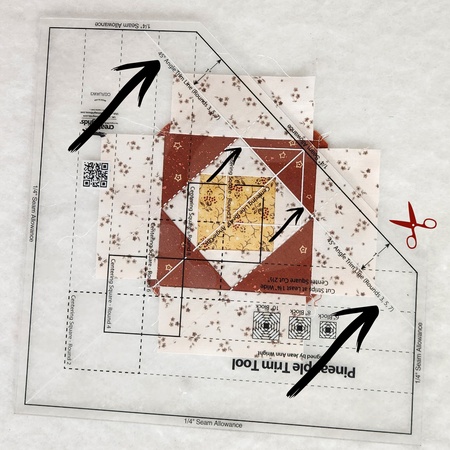 |
Step 7: Trim Round 3
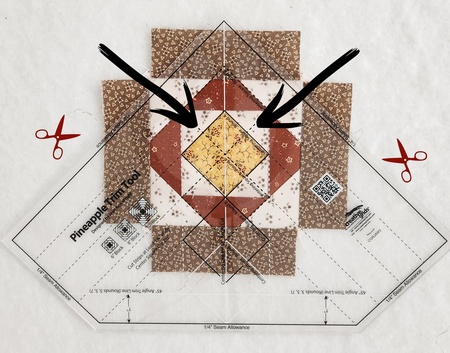
Caution: We are not aligning the center fabric on this round as in the past steps.
- Place the Creative Grids Pineapple Trim Tool "45 degree Angle Trim Line for Rounds 3, 5, 7" along your fabric unit as shown in the image.
- Look through the clear ruler and make sure the white dotted marking lines are aligned with your seam lines.
- Make sure the solid white line goes from point to point through your center fabric square.
- The trim tool should feel "locked in" visually before you cut. If several markings line up at the same time, you know your block is centered correctly.
- Trim one side.
- Rotate the block and realign carefully as above.
- Repeat for all four sides.
Note: Don't panic! Your center square will not align with any of the markings. |
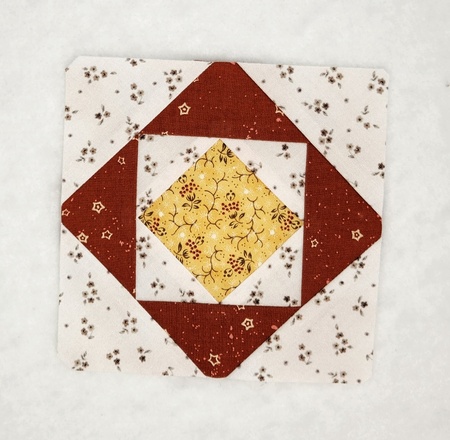 |
| Notice how the alternating light and dark fabrics are beginning to form the characteristic pineapple rings. |
| |
| |
 |
Step 8: Add Round 4
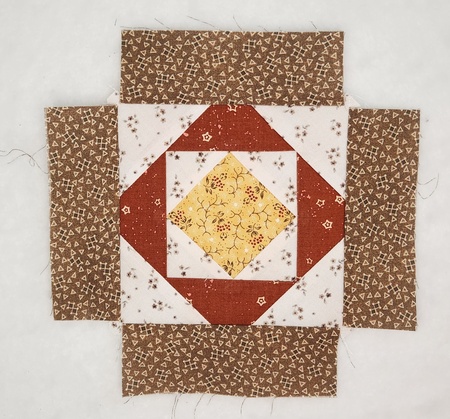
- For Round 4, add four strips of your next fabric. I used a brown fabric.
- Just as before, sew a strip to one side with a 1/4 inch seam allowance.
- Press away from the center.
- Add the opposite strip and press.
- Complete with the two remaining sides.
After sewing and pressing, all four brown fabrics surround the light third round.
|
| |
| |
 |
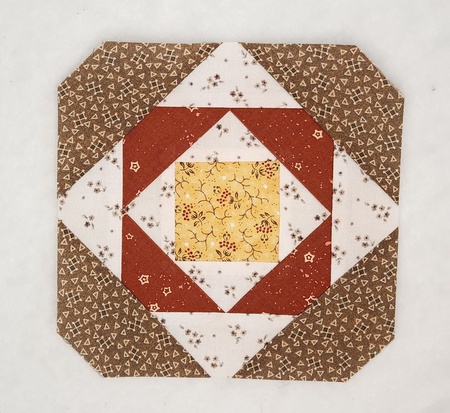
Step 9: Trim Round 4
- Place the Creative Grids Pineapple Trim Tool over the center square again.
- This time, use the ruler markings labeled "Centering Square - Round 4".
- Carefully align the printed reference lines with the seams you have already created.
- Once everything is aligned, trim the exposed fabric along two sides of the ruler.
- Rotate the block, repeat the alignment, and trim along the remaining two sides of the ruler.
|
 |
| You are probably catching on to the rhythm by now, but I’m going to continue walking you through each step so you can see exactly how the block comes together. |
| |
| |
 |
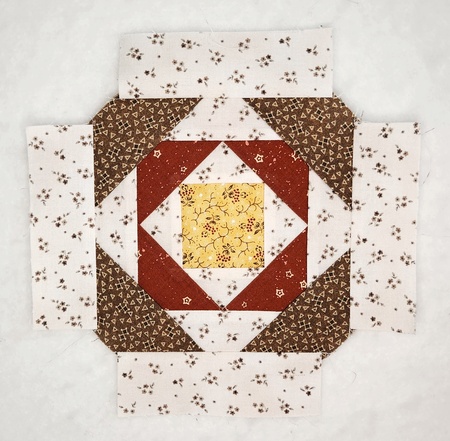
Step 10: Add Round 5
- Round 5 returns to the light fabric in my sample.
- Arrange a strip on each side of the block.
- Sew the strips to opposite sides first.
- Add the remaining two strips.
- Use a consistent 1/4 inch seam allowance.
- Press each seam away from the center.
Again, do not try to make the outside edges perfectly even. The trimming step will do that for you.
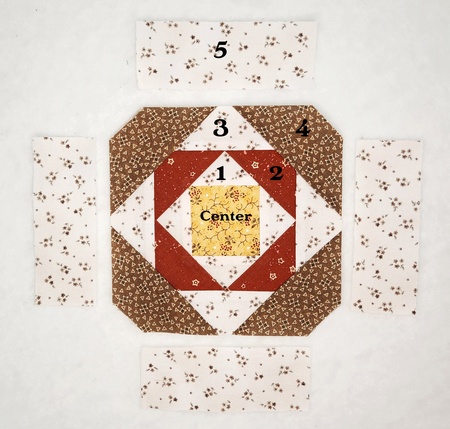
Are you starting to get a little confused on what round you are on? The above image shows how to count the numbering sequence of rounds. |
 |
| |
| |
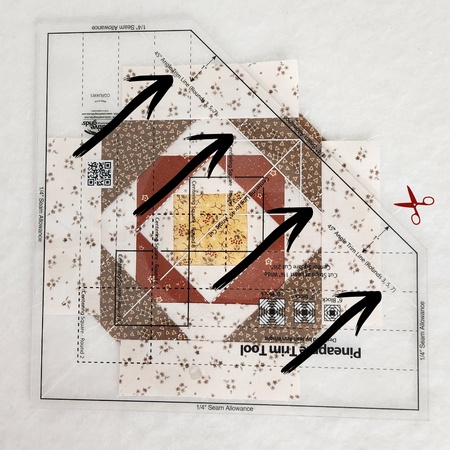 |
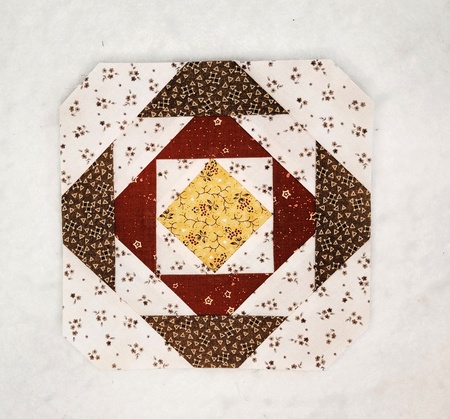
Step 11: Trim Round 5
Caution: We are not aligning the center fabric on this round as in the past steps.
- Place the Creative Grids Pineapple Trim Tool "45 degree Angle Trim Line for Rounds 3, 5, 7" along your fabric unit as shown in the image.
- Look through the clear ruler and make sure the white dotted marking lines are aligned with your seam lines.
- Make sure the solid white line goes from point to point through your center fabric square.
- The trim tool should feel "locked in" visually before you cut. If several markings line up at the same time, you know your block is centered correctly.
- Trim one side.
- Rotate the block and realign carefully as above.
- Repeat for all four sides.
Note: Don't panic! Your center square will not align with any of the markings. |
 |
| |
| |
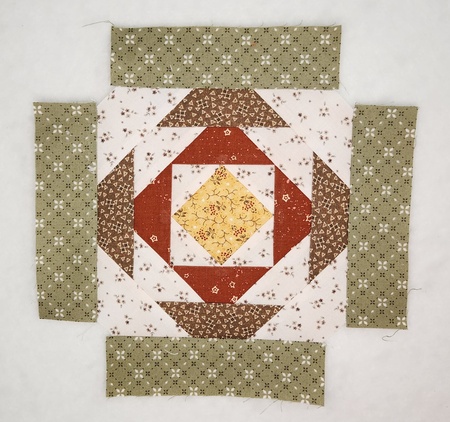 |
Step 12: Add Round 6
- For Round 6, add four strips of your next fabric. I used an olive green fabric.
- Just as before, sew a strip to one side with a 1/4 inch seam allowance.
- Press away from the center.
- Add the opposite strip and press.
- Complete with the two remaining sides.
|
| |
| |
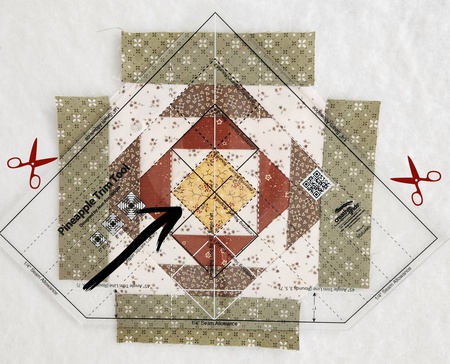 |
Step 13: Trim Round 6
- Place the Creative Grids Pineapple Trim Tool over the center square again.
- This time, use the ruler markings labeled "Centering Square - Round 6".
- Carefully align the printed reference lines with the seams you have already created.
- Once everything is aligned, trim the exposed fabric along two sides of the ruler.
- Rotate the block, repeat the alignment, and trim along the remaining two sides of the ruler.
|
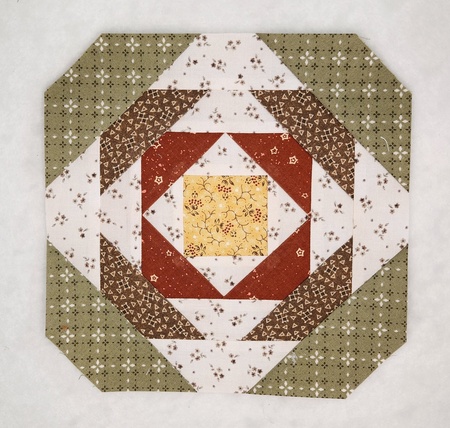 |
| Note: If you are making a 10 inch finished Pineapple Block (10 1/2 inches unfinished), repeat one additional light round and one additional dark round, following Steps 10–13 above. Then continue to the Rabbit Ear Corners. |
| |
| |
 |
|
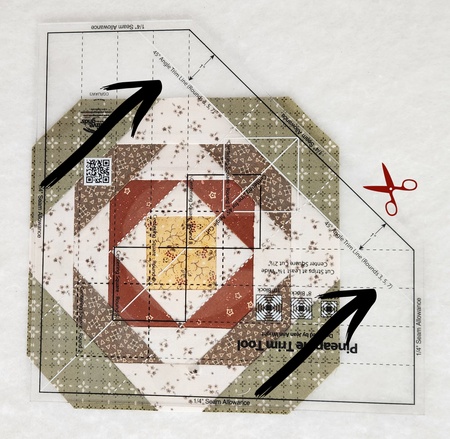
Step 14: Final Trim before adding the Rabbit Ear Corners
Since I am making an 8 inch finished Pineapple Block (8 1/2 inches unfinished), Round 6 was my final round. Now it’s time to prepare the block for the Rabbit Ear Corners.
Before adding the corners, there is one final trim to make.
Caution: For this trim, we are not aligning the center fabric as we did in the previous steps.
- Place the Creative Grids Pineapple Trim Tool on your fabric unit as shown in the image, using the “45 degree Angle Trim Line for Rounds 3, 5, 7.”
- Look through the clear ruler and make sure the white dotted marking lines align with your seam lines.
- Check that the solid white line runs from point to point through the center fabric square.
- Before cutting, the trim tool should look and feel visually “locked in.” When several markings align at the same time, you will know the block is centered correctly.
- Trim the first side.
- Rotate the block and carefully realign the trim tool using the same markings.
- Repeat until all four sides have been trimmed.
|
| |
| |
 |
|
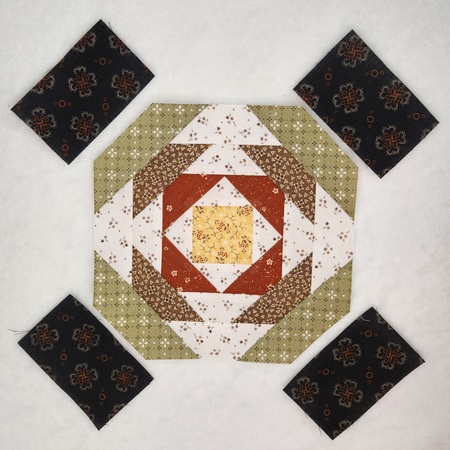
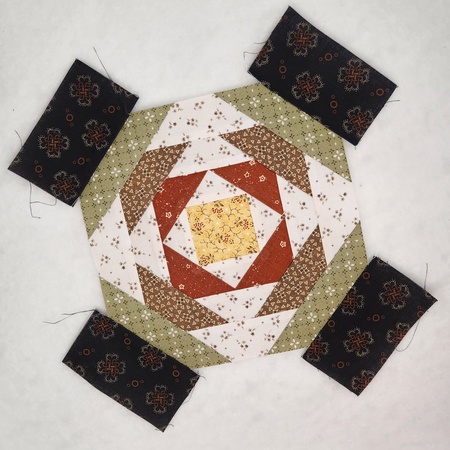
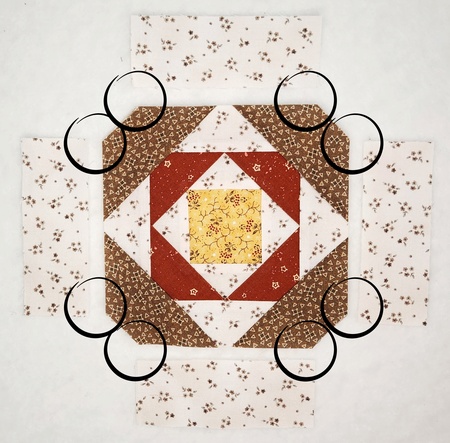
Step 15: Add the Rabbit Ear Corners
- Sew one 2 1/2 inch × 4 inch Rabbit Ear unit to each of the four outside corners of the final round using a 1/4 inch seam allowance.
- Press the seams away from the center of the block.
|
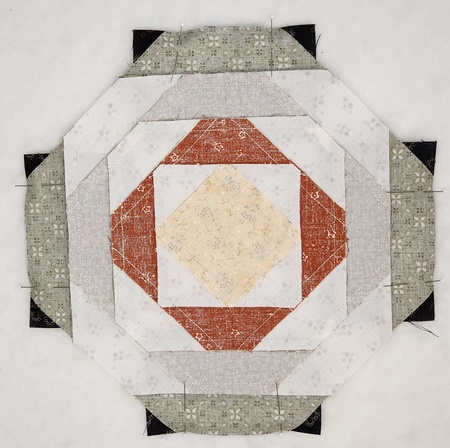 |
| I like to pin at this step so the feed dogs pull both layers of fabric evenly through the sewing machine. I visually center each Rabbit Ear unit on the corner fabric before pinning and sewing. |
 |
| |
| |
 |
|
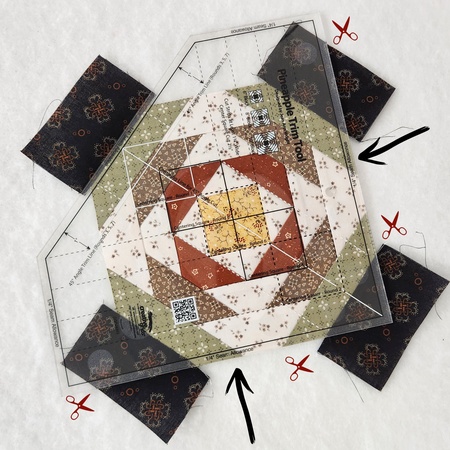
Step 16: Final Trim
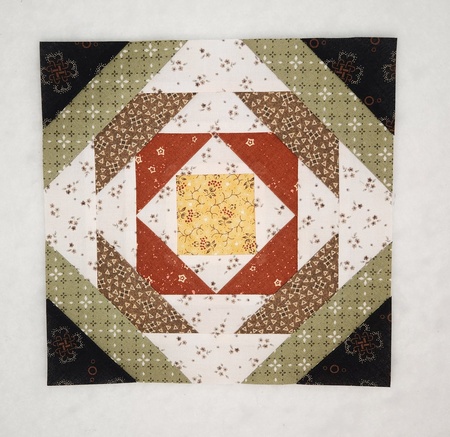
The final step is to trim away the excess fabric from the Rabbit Ear Corners and square the block to 8 1/2 inches.
- Place the Creative Grids Pineapple Trim Tool on your block, aligning two straight edges of the ruler with the block.
- Trim along two sides. Rotate the block and carefully realign the Trim Tool.
- Note: Angle the Trim Tool as needed for comfort and safe cutting. If trimming two sides from one position does not feel comfortable or safe, trim one side at a time.
- Rotate the block and carefully realign the Trim Tool.
- Trim the remaining two sides, squaring the block to 8 1/2 inches × 8 1/2 inches.
|
 |
| |
| |
 |
|
Tips:
- When adding fabric strips, you can visually estimate the placement. Center each strip as evenly as possible along the edge before sewing.
- You will need four fabric pieces for each round. To make cutting easier, after cutting my width-of-fabric (WOF) strips, I stacked four layers together before making the subcuts. This eliminated the need to count individual pieces, each cut gave me the four pieces needed for one block. Then, I simply made one cut for each block I was making.
|
| |
| |
| Why I Like This Method
As with many quilt blocks, there are several ways to make a Pineapple Block. I prefer this method because the markings on the Creative Grids Pineapple Trim Tool, along with trimming after each round, take the guesswork out of the process. I found the tool easy and fun to use, and I love the consistent results.
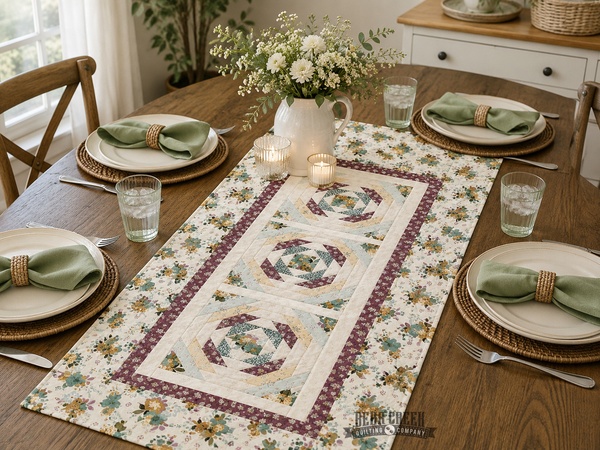
In fact, I enjoyed making these blocks so much that I created several seasonal table runners using three 10 inch finished Pineapple Blocks, along with a little sashing and a few borders. They made fun and easy one-day projects!
I hope this tutorial has inspired you to give the Creative Grids Pineapple Trim Tool a try and maybe even go a little Pineapple Block crazy!
Happy Sewing!
|
 |
| |
| |
 |