Christmas Row Quilt Sew-Along: Poinsettia Row
|
|
Welcome Back, Quilters!
It’s time for Row 3 of our Christmas Row Quilt Sew-Along!
This month, we’re bringing the holiday spirit to life with the cheerful and festive Poinsettia Row.
Let the magic of the season continue—one stitch at a time!
|
|

|
|
Follow Bear Creek's Virtual Helper, Patty, as she artfully brings our "Up on the Housetop Christmas Row" quilt top to life. Follow along with her expert tips and insider guidance during our exciting Sew-Along event!
|
|

|
|
Poinsettia Row
- Gather the specified materials listed in your Christmas Row Quilt Pattern.
- Follow the cutting and piecing instructions.
You’ll be piecing six beautiful Poinsettia Blocks in this step! The quilt top only needs five blocks so you will have an extra to use elsewhere.
Once completed, sew the blocks and sashings together to form the third row of your cheerful Christmas Row Quilt.
Video Tutorial:
LaVonne has a technique VIDEO available that demonstrates how to create the Poinsettia petals and assemble the block. Note that the Poinsettia blocks use a partial seam during construction. (You can disregard the section of the video that covers creating the stem block.)
|
| Patty’s Tips for the Poinsettia Row: |
|

|
Fabric Identification:
- Refer to the above image for easy identification for Red #1 and Red #2.
|
 |
Important Notes:
- A total of six Poinsettia Blocks will be sewn with opposite orientations.
- In the pattern instructions, you will create two flowers at the same time.
- You will only need five Poinsettia Blocks for the quilt top. The extra Poinsettia Block can be used in a pieced backing or as part of your quilt label.
|
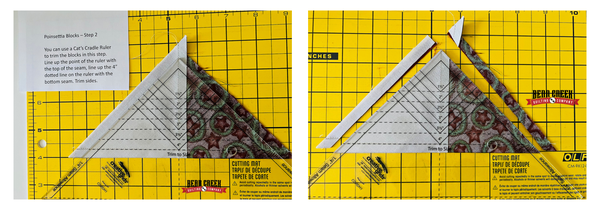 |
Step 2:
- Align the point of the Cat's Cradle Tool with the vertical seam, and place the 4" dotted line along the bottom horizontal seam.
- After pressing your block open, you can also use a square ruler to trim your block to the correct size.
|
 |
Step 3:
- Follow the instructions for this step in the quilt pattern. Use a triangle ruler to make your cuts, as shown in the image above.
- When pressing the blocks open, keep in mind that these are bias edges. Press gently to avoid stretching or distorting the fabric.
- Starching your fabric before sewing and cutting can help reduce stretching along the bias.
- Caution: Starching may cause fabric shrinkage. Always starch your fabrics before cutting out your block pieces.
|
 |
Step 6:
- The images above are provided to offer additional guidance alongside the pattern instructions.
|
|
|
|
Sew-Along Schedule
The sew-along spans several months, with each month focusing on a new row.
Here’s the schedule:
- February - Month 1: Kick-Off & Fabric Requirements
- March - Month 2: Ornament Row
- April - Month 3: Stocking Row
- May - Month 4: Poinsettia Row - We are HERE!
- June - Month 5: Christmas Tree Row
- July - Month 6: Presents Row
- August - Month 7: Holly Rows
- September - Month 8: Assembly
- October - Month 9: Quilt & Finish
|
|
|
|
We can't wait to see you next month for Tree Row!
Until then, may your stitches be straight, your seams be smooth, and your bobbins stay full. Let your creativity bloom like a poinsettia in full color!
|
|
All monthly Christmas Row Quilt Sew-Along posts will appear on our blog. This is not a Zoom class or a specific time to check in. Sew at your own pace as you follow along on the Sew-Along schedule.
The Christmas Row Quilt Pattern is required to participate as no cutting/sizing information will be given.
Christmas Row Quilt Kits are available. Quilt Kits include the Christmas Row Quilt Pattern and fabrics from Up On The Housetop fabric collection used in the pattern.
Our Bear Creek Quilting Company Exclusive Sew-Alongs private Facebook Group is available to join. Be sure to complete all the questions and agree to the group rules or the automated-moderator may deny your request to join.
|
| |
| Questions?? Email us at sales@BearCreekQuiltingCompany.com |
| |

and the BCQC Team |

