
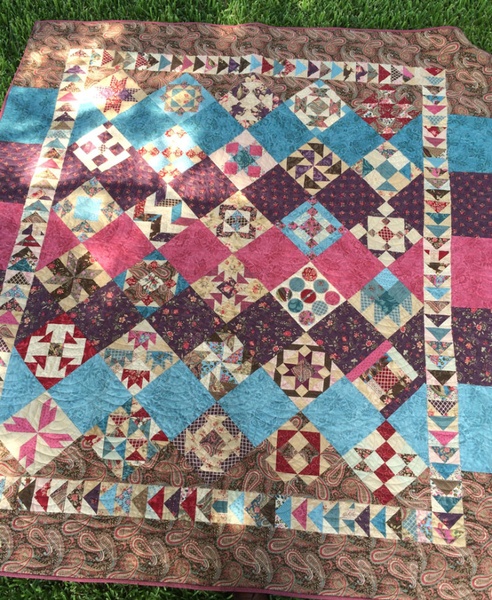
 Moda Sampler Block Shuffle Quilt 59 1/2 inches x 68 inches |
|
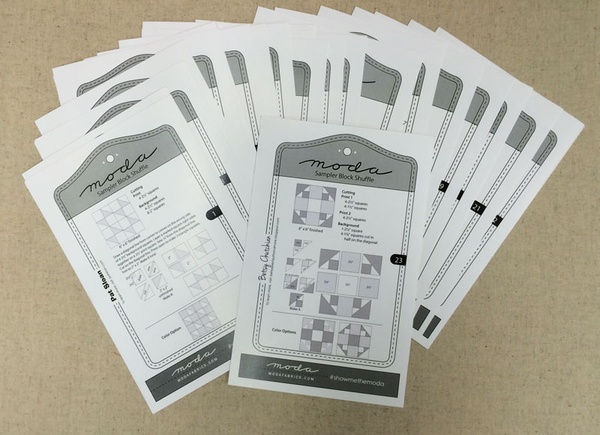 Available for a limited time - start collecting today! |
|
 |
 |
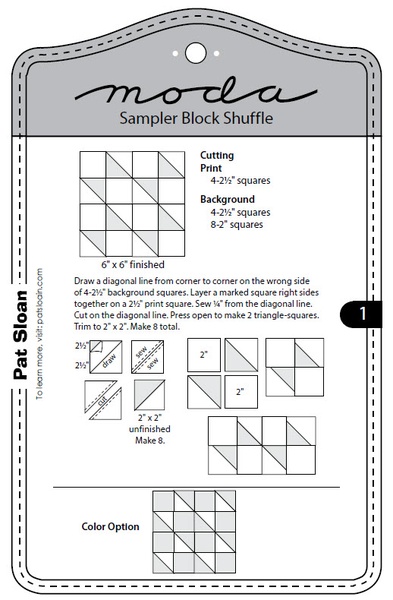
| October 30, 2015 Block 1 - Pat Sloan (Click on above image for free printable pattern) Tips & Tricks: There are variety of ways to create half-square triangles. Find what works best for you. Diagonal Line: Place 2 fabric squares (right sides together) and draw a diagonal line from corner to corner. Stitch 1/4 inch on each side. Cut on the diagonal line. (Yields 2) Triangles: Cut fabric triangles individually and sew 2 triangles together with a 1/4 inch seam allowance (Yields 1) Magic 8: Using 2 fabric squares (right sides together) draw a diagonal line from corner to corner, both directions, creating an "X". Stitch 1/4 inch to the right and left of each marked line. Before cutting, mark a vertical and horizontal line on your fabric. Cut on the vertical and horizontal lines first. Then cut on the diagonal line. (Yields 8) Free tutorial available HERE. |
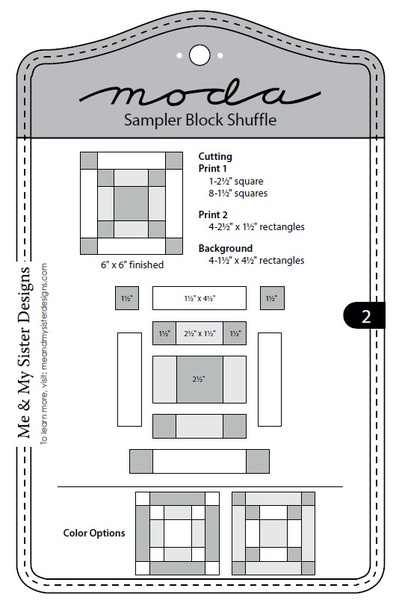
October 30, 2015 Block 2 - Me & My Sister Designs (Click on above image for free printable pattern) Tips & Tricks: This block is a good block to test your cutting, sewing and pressing techniques. Cutting: Check to see if the fabric edge is inside, outside or on the line of the ruler. Be consistent with your ruler. Seam Allowance: Measure the placement of your needle with the foot and mark 1/4 inch, use stacked note-cards to mark seam allowance. Pressing: Pressing seams open (vs. to the dark) provides less bulk. Set your seam by pressing your stitched line first then press your seam from the front to eliminate pleats. |
 |
 |
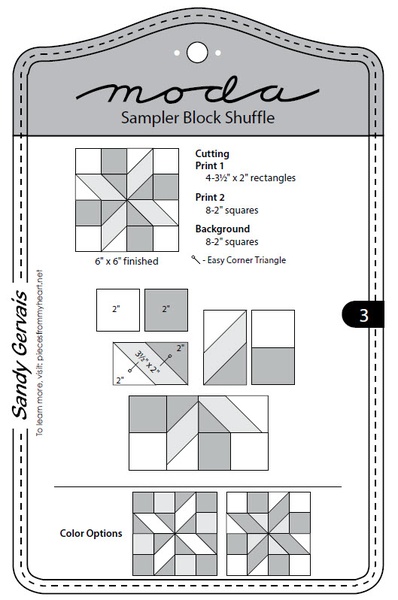
| October 30, 2015 Block 3 - Sandy Gervais (Click on above image for free printable pattern) Tips & Tricks: Using a scant 1/4 inch seam allowance gives you more fabric to press back and makes up room for the thread space. Stitch a needle width inside your seam line for a scant 1/4 inch seam allowance. |
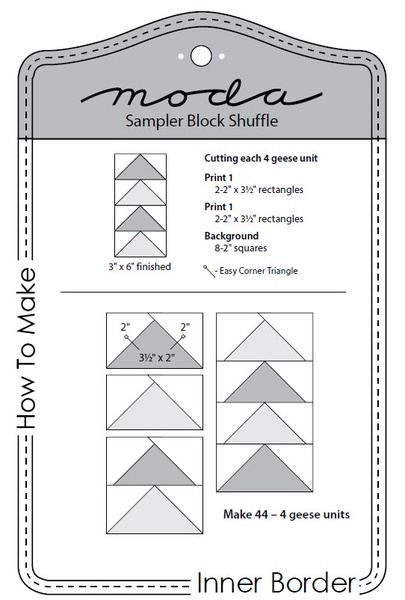
October 30, 2015 How to Make the Inner Border (Click on above image for free printable pattern) |
 |
 |
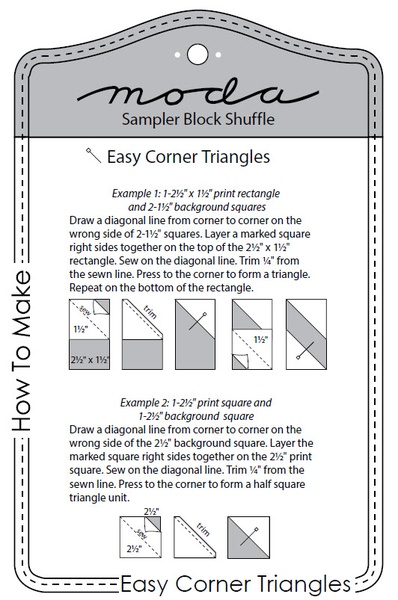
| October 30, 2015 How to Make the Easy Corner Triangles (Click on above image for free printable pattern) |
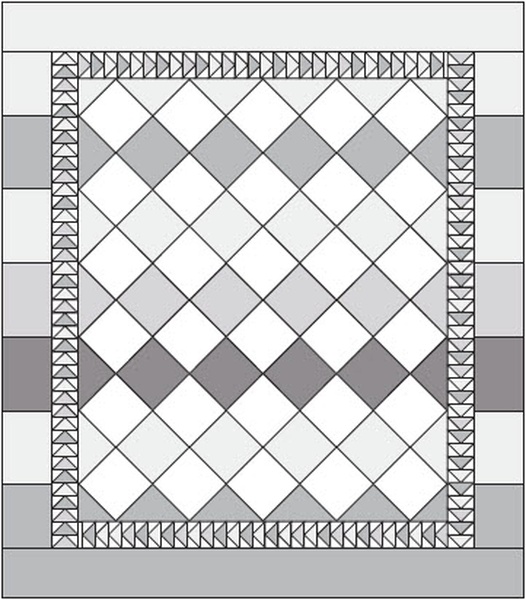
October 30, 2015 Setting Instructions for Moda Sampler Block Shuffle Quilt 59 1/2 inches x 68 inches (Click on above image for free printable pattern) |
 |
 |
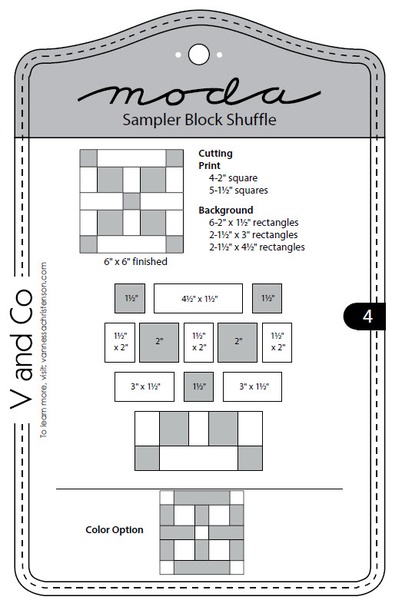
| November 6, 2015 Block 4 - V and Co. (Click on above image for free printable pattern) Tips & Tricks: Fabric value and placement can quickly change the look of your blocks. Play with light, medium and dark fabric value placements for different appearances. Try using different fabric combinations such as reproduction prints, brights and batiks together to find the perfect balance of color combinations. |
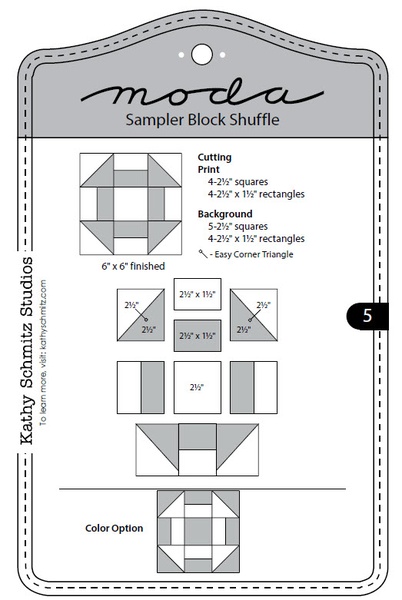
November 6, 2015 Block 5 - Kathy Schmitz Studios (Click on above image for free printable pattern) Tips & Tricks: Grab that beautiful image of a large print by fussy cutting around the design. Cut out a square from the center of a note card to audition fabrics before fussy cutting the print. This allows you to concentrate on the specific image on your fabric while blocking the remaining print from view. |
 |
 |
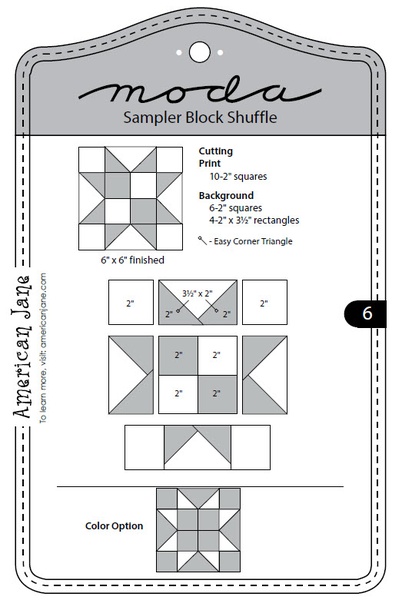
| November 6, 2015 Block 6 - American Jane (Click on above image for free printable pattern) Tips & Tricks: There are variety of ways to create flying geese units. Traditional Technique, Flip-Flip-Finish, Fast and Furious, and Paper-Pieced. Find what works best for you. Free tutorial available HERE. |
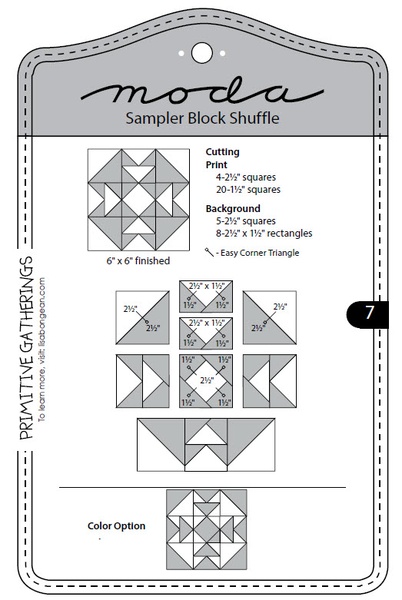
November 13, 2015 Block 7 - Primitive Gatherings (Click on above image for free printable pattern) Tips & Tricks: With smaller fabric pieces, thread weight and stitch length can make a difference in your piecing. In this case, it is suggested to use a high quality finer weight thread and smaller stitches. The higher the thread weight number the thinner (finer) the thread. Test stitch lengths for yourself by doing a practice stitch length 2.0 or 14 stitches per inch and comparing it to a 3.0 or 9 stitches per inch. |
 |
 |
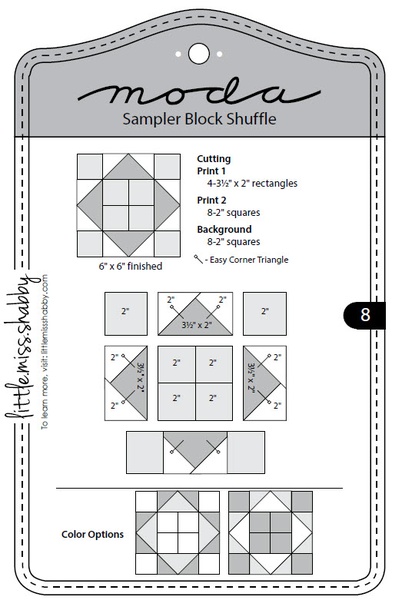
| November 13, 2015 Block 8 - Little Miss Shabby (Click on above image for free printable pattern) Tips & Tricks: Suggested pressing throughout the piecing process is with a dry iron. If you prefer steam, use it on your finished block to avoid distorting the small shapes. |
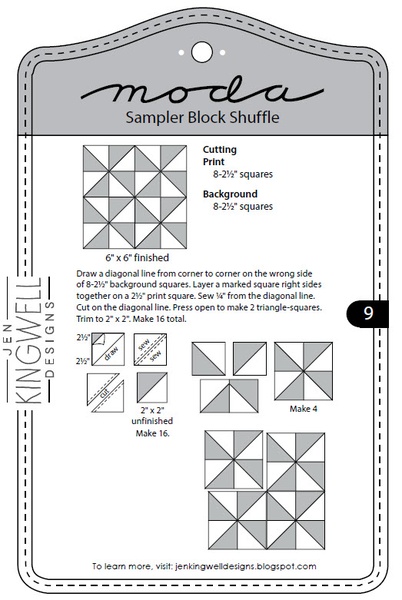
November 13, 2015 Block 9 - Jen Kingwell Designs (Click on above image for free printable pattern) |
 |
 |
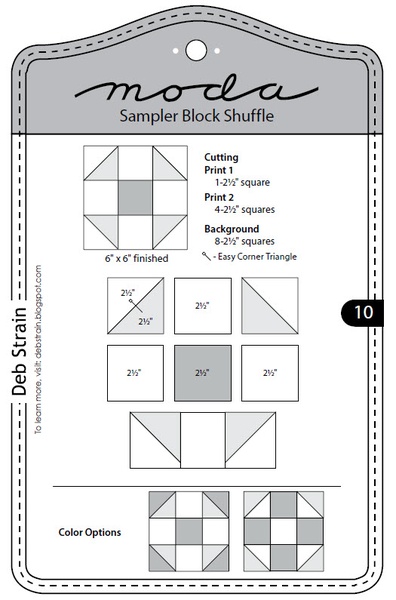
| November 20, 2015 Block 10 - Deb Strain (Click on above image for free printable pattern) |
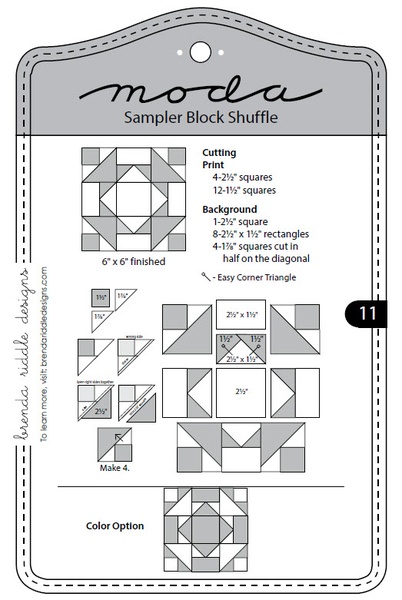
November 20, 2015 Block 11 - Brenda Riddle Designs (Click on above image for free printable pattern) |
 |
 |
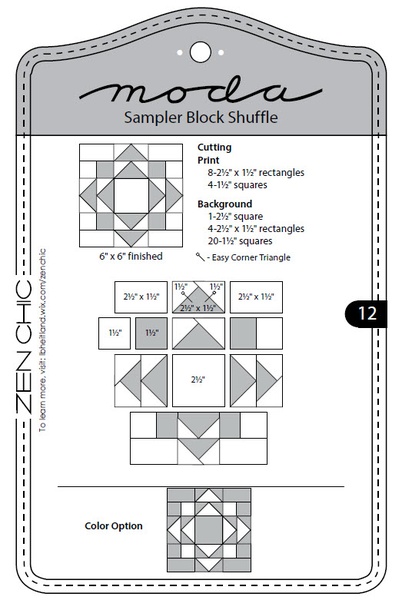
| November 20, 2015 Block 12 - Zen Chic (Click on above image for free printable pattern) |
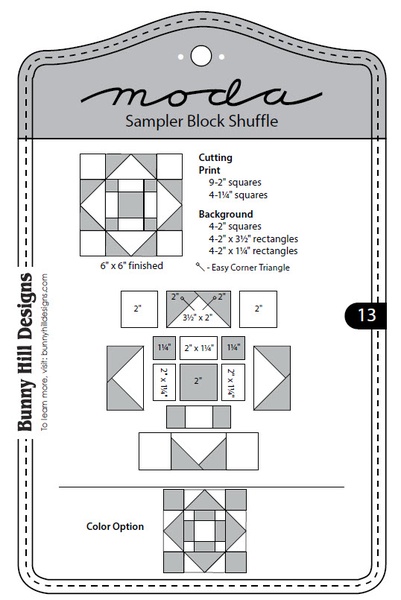
November 27, 2015 Block 13 - Bunny Hill Designs (Click on above image for free printable pattern) |
 |
 |
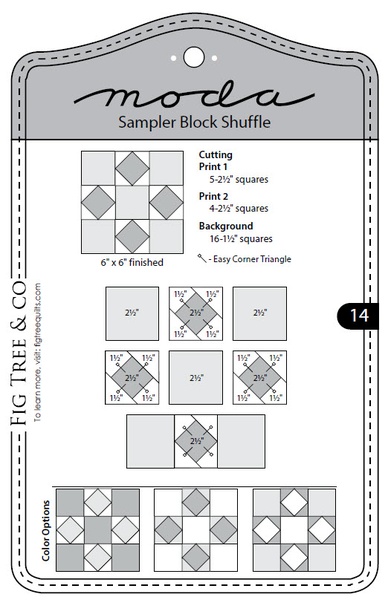
| November 27, 2015 Block 14 - Fig Tree & Co. (Click on above image for free printable pattern) |
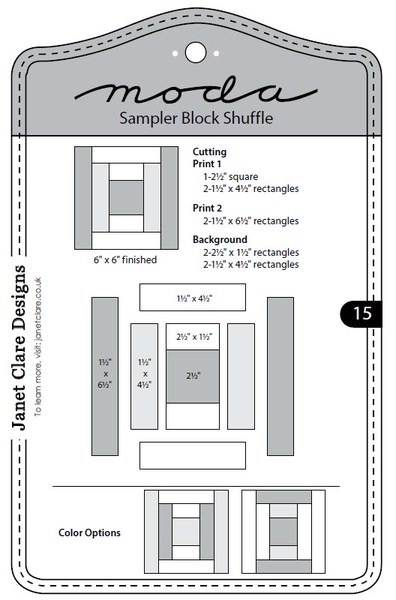
November 27, 2015 Block 15 - Janet Clare Designs (Click on above image for free printable pattern) |
 |
 |
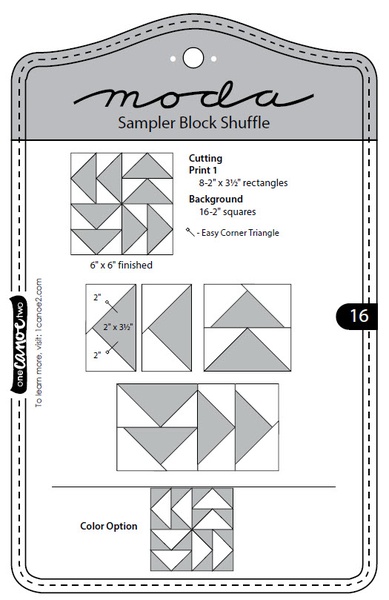
| December 4, 2015 Block 16 - One Canoe Two (Click on above image for free printable pattern) |
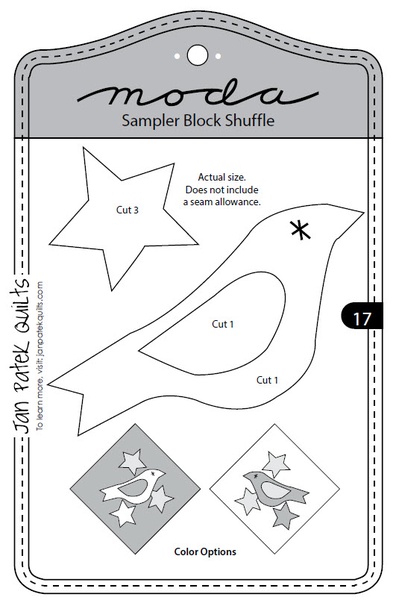
December 4, 2015 Block 17 - Jan Patek Quilts (Click on above image for free printable pattern) Tips & Tricks: Applique introduces a variety of choices for your sewing project; fusibles, stitches and threads. Try different ones for different projects for the results that please you. Fusible Interfacing: Often confused with "stabilizer", which is often meant to be removed at the sewing project completion, fusible interfacing remains attached even when the project is finished. Fusible interfacing can have fusible glue on one-side or both, depending on your project needs. The glue is activated from the heat of an iron. It also comes in many "weights" - this can give your applique a soft feel (light-weight) or a very heavy stiff feel (heavy-weight). Machine Stitches: Common machine applique stitches over raw-edge applique are Blanket, Zig Zag, Satin, Straight and decorative (depending on your sewing machine model). Hand Stitches: You can do similar stitches over raw-edge applique, such a Blanket stitch for a decorative look. For finished edges, needle-turn or turned-edge is suggested. Thread: Silk, light weight cotton and invisible thread can be used for machine applique and hand applique. Thicker embroidery thread can also be used with a Blanket stitch for hand applique to finish your edges. |
 |
 |
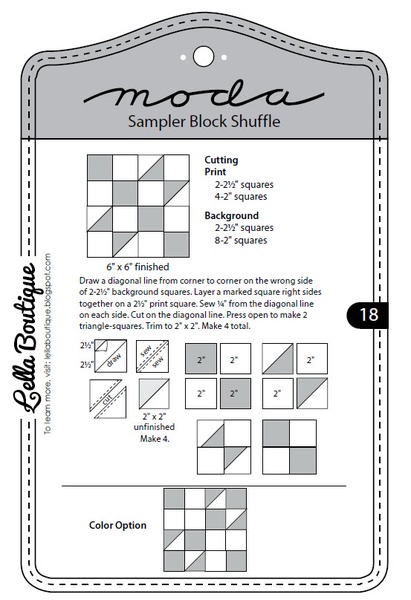
| December 4, 2015 Block 18 - Lella Boutique (Click on above image for free printable pattern) Tips & Tricks: Your sewing machine needle should be changed often, not just when it breaks. Tension problems can occur from dull or bent needles. Check your tension with this little test: sew with two different colors of thread; one color in the bobbin and a different color in the top. Is your bottom thread visible on the top of your fabric? Is your top thread visible on the bottom of you fabric? You should adjust your tension, in small changes, to achieve your best stitches. |
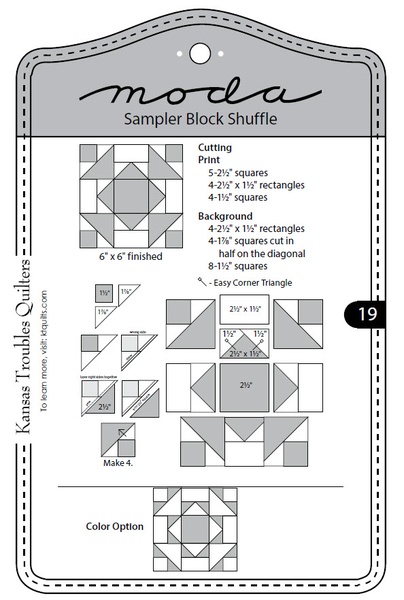
December 11, 2015 Block 19 - Kansas Troubles Quilters (Click on above image for free printable pattern) Tips & Tricks: Since these are all 6 inch blocks, make a small pillow or table runner with several of your favorite block patterns. Add coordinate sashing and maybe a border to increase the size and you have a perfect quick gift idea! |
 |
 |
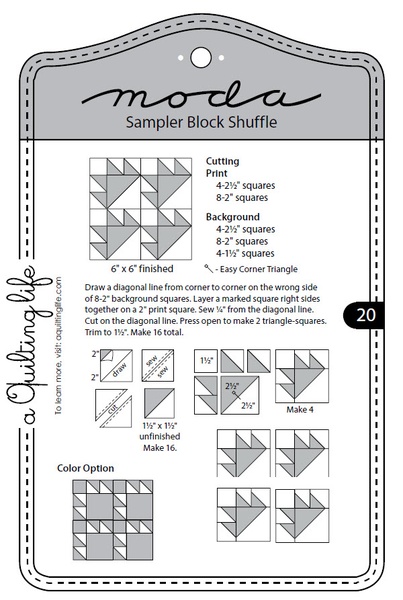
| December 11, 2015 Block 20 - A Quilting Life (Click on above image for free printable pattern) Tips & Tricks: Make a flannel design board to audition your blocks for best placement. Pin a vinyl table cloth (with the fuzzy flannel side out), 108" flannel backing fabric or a large piece of fleece to the wall. Place your fabric blocks on your design wall and stand at a distance to preview your layout. Look for good contrast - light and dark, and color placement. Audition your blocks in several different positions to achieve your most favorite layout. |
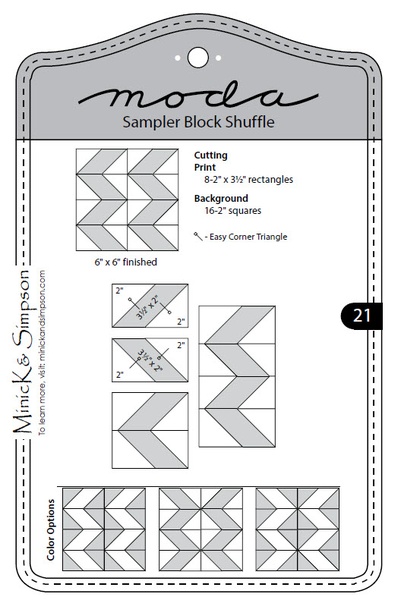
December 11, 2015 Block 21 - Minick & Simpson (Click on above image for free printable pattern) |
 |
 |
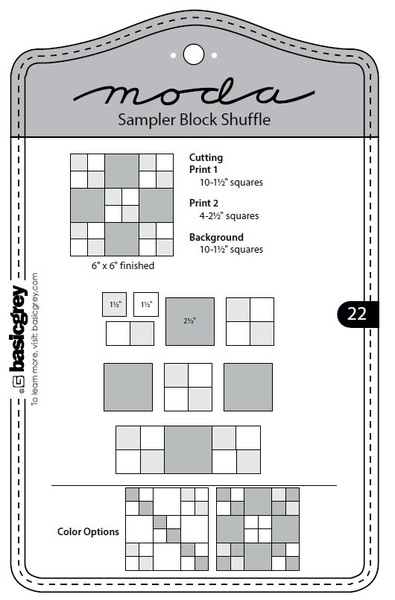
| December 18, 2015 Block 22 - Basic Grey (Click on above image for free printable pattern) Tips & Tricks: This block is wonderful to make in multiples. It increases your skills in cutting accuracy, strip piecing, precise 1/4 inch seam allowance and pressing. Turn your practice blocks into pincushions as a gift for your quilting/sewing friends. Or combine your practice blocks for a charity quilt. |
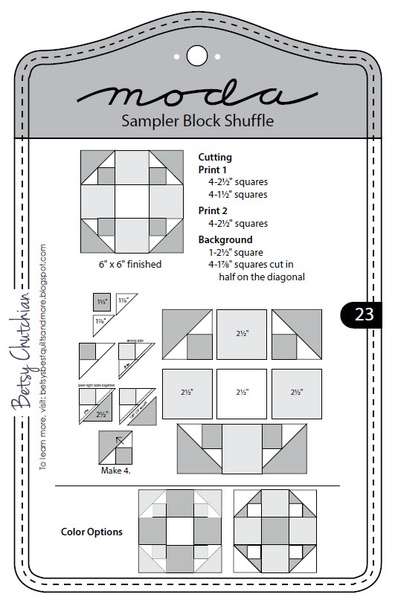
December 18, 2015 Block 23 - Betsy Chutchian (Click on above image for free printable pattern) Tips & Tricks: Color placement can really change the look of this block; plus sign, shoofly or circles. Turn this block on point for a completely different look. |
 |
 |
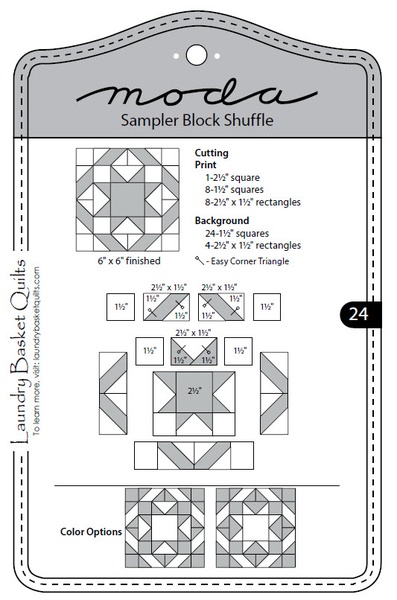
| December 18, 2015 Block 24 - Laundry Basket Quilts (Click on above image for free printable pattern) Tips & Tricks: This block has 45 pieces and is not for the faint of heart, but WOW, what a beautiful block! Another skill strengthening block. Go slow, be precise and you can do this! Enlarging Trick: If you would like to make this block 12" instead of 6", use this easy formula - For Square and Rectangles:cut size - seam allowance x 2 + seam allowance = new size Example: 2 1/2" - 1/2" x 2 + 1/2" = 4 1/2" |
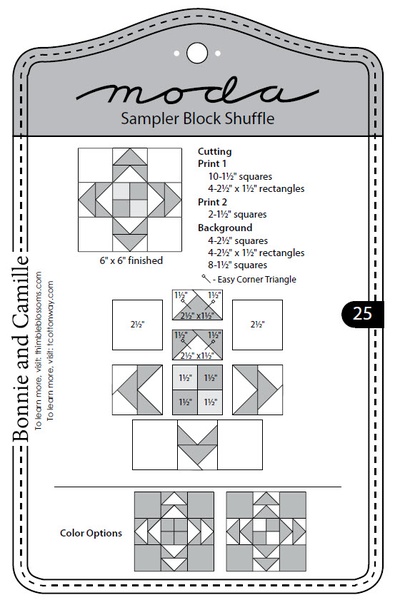
January 1, 2016 Block 25 - Bonnie and Camille (Click on above image for free printable pattern) HAPPY NEW YEAR! |
 |
 |
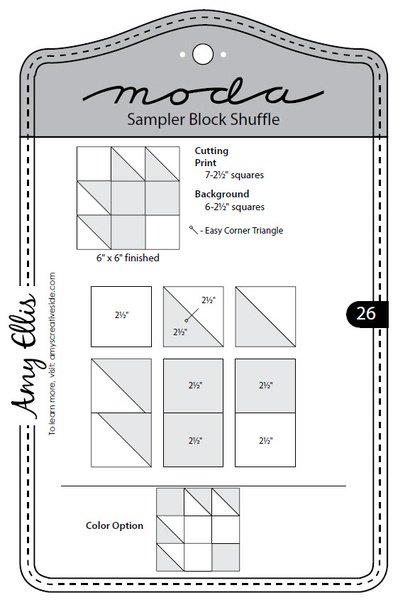
| January 1, 2016 Block 26 - Amy Ellis (Clilck on above image for free printable pattern) Bear Paw Block - one of our favorites! (wink, wink) |
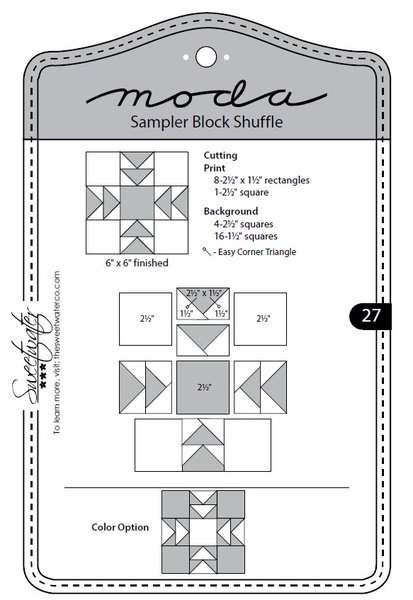
January 1, 2016 Block 27 - Sweetwater (Click on above image for free printable pattern) HAPPY NEW YEAR! |
 |
 |
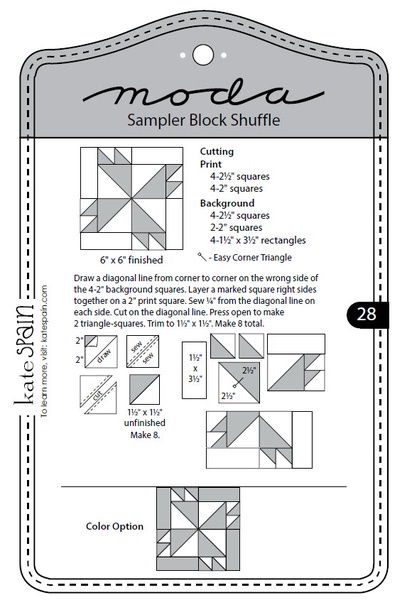
| January 8, 2016 Block 28 - Kate Spain (Click on above image for free printable pattern) Tips & Tricks: Do you press our seams open or to one side? There are times when pressing seams open helps the small blocks to lay flat. It is also helpful when trying to match many points or centers of blocks. |
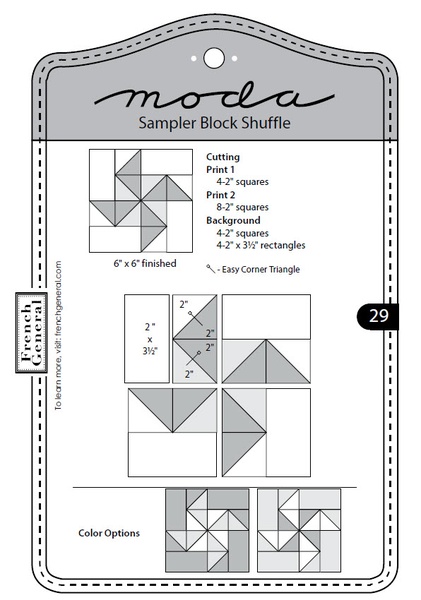
January 8, 2016 Block 29 - French General (Click on above image for free printable pattern) |
 |
We hope you have enjoyed participating in this fun Block-of-the-Week. It has been a pleasure to post the blocks for you and include friendly Tips & Tricks that may make your quilting just a little bit easier. Thank you for "shuffling" along with us! Please keep posting your blocks and your completed quilts on our Facebook page. (#modasamplershuffle) |
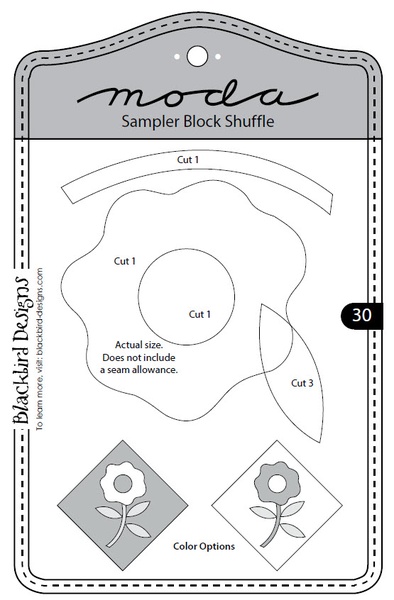
| January 8, 2016 Block 30 - Blackbird Designs (Click on above image for free printable pattern) Tips & Tricks: Time to assemble your quilt! Is it the size you want? You can make extra blocks of your favorites or use a solid alternate block to increase your quilt to your preferred size. Need it just a little bigger? Adding an additional border or two is another idea. |
|